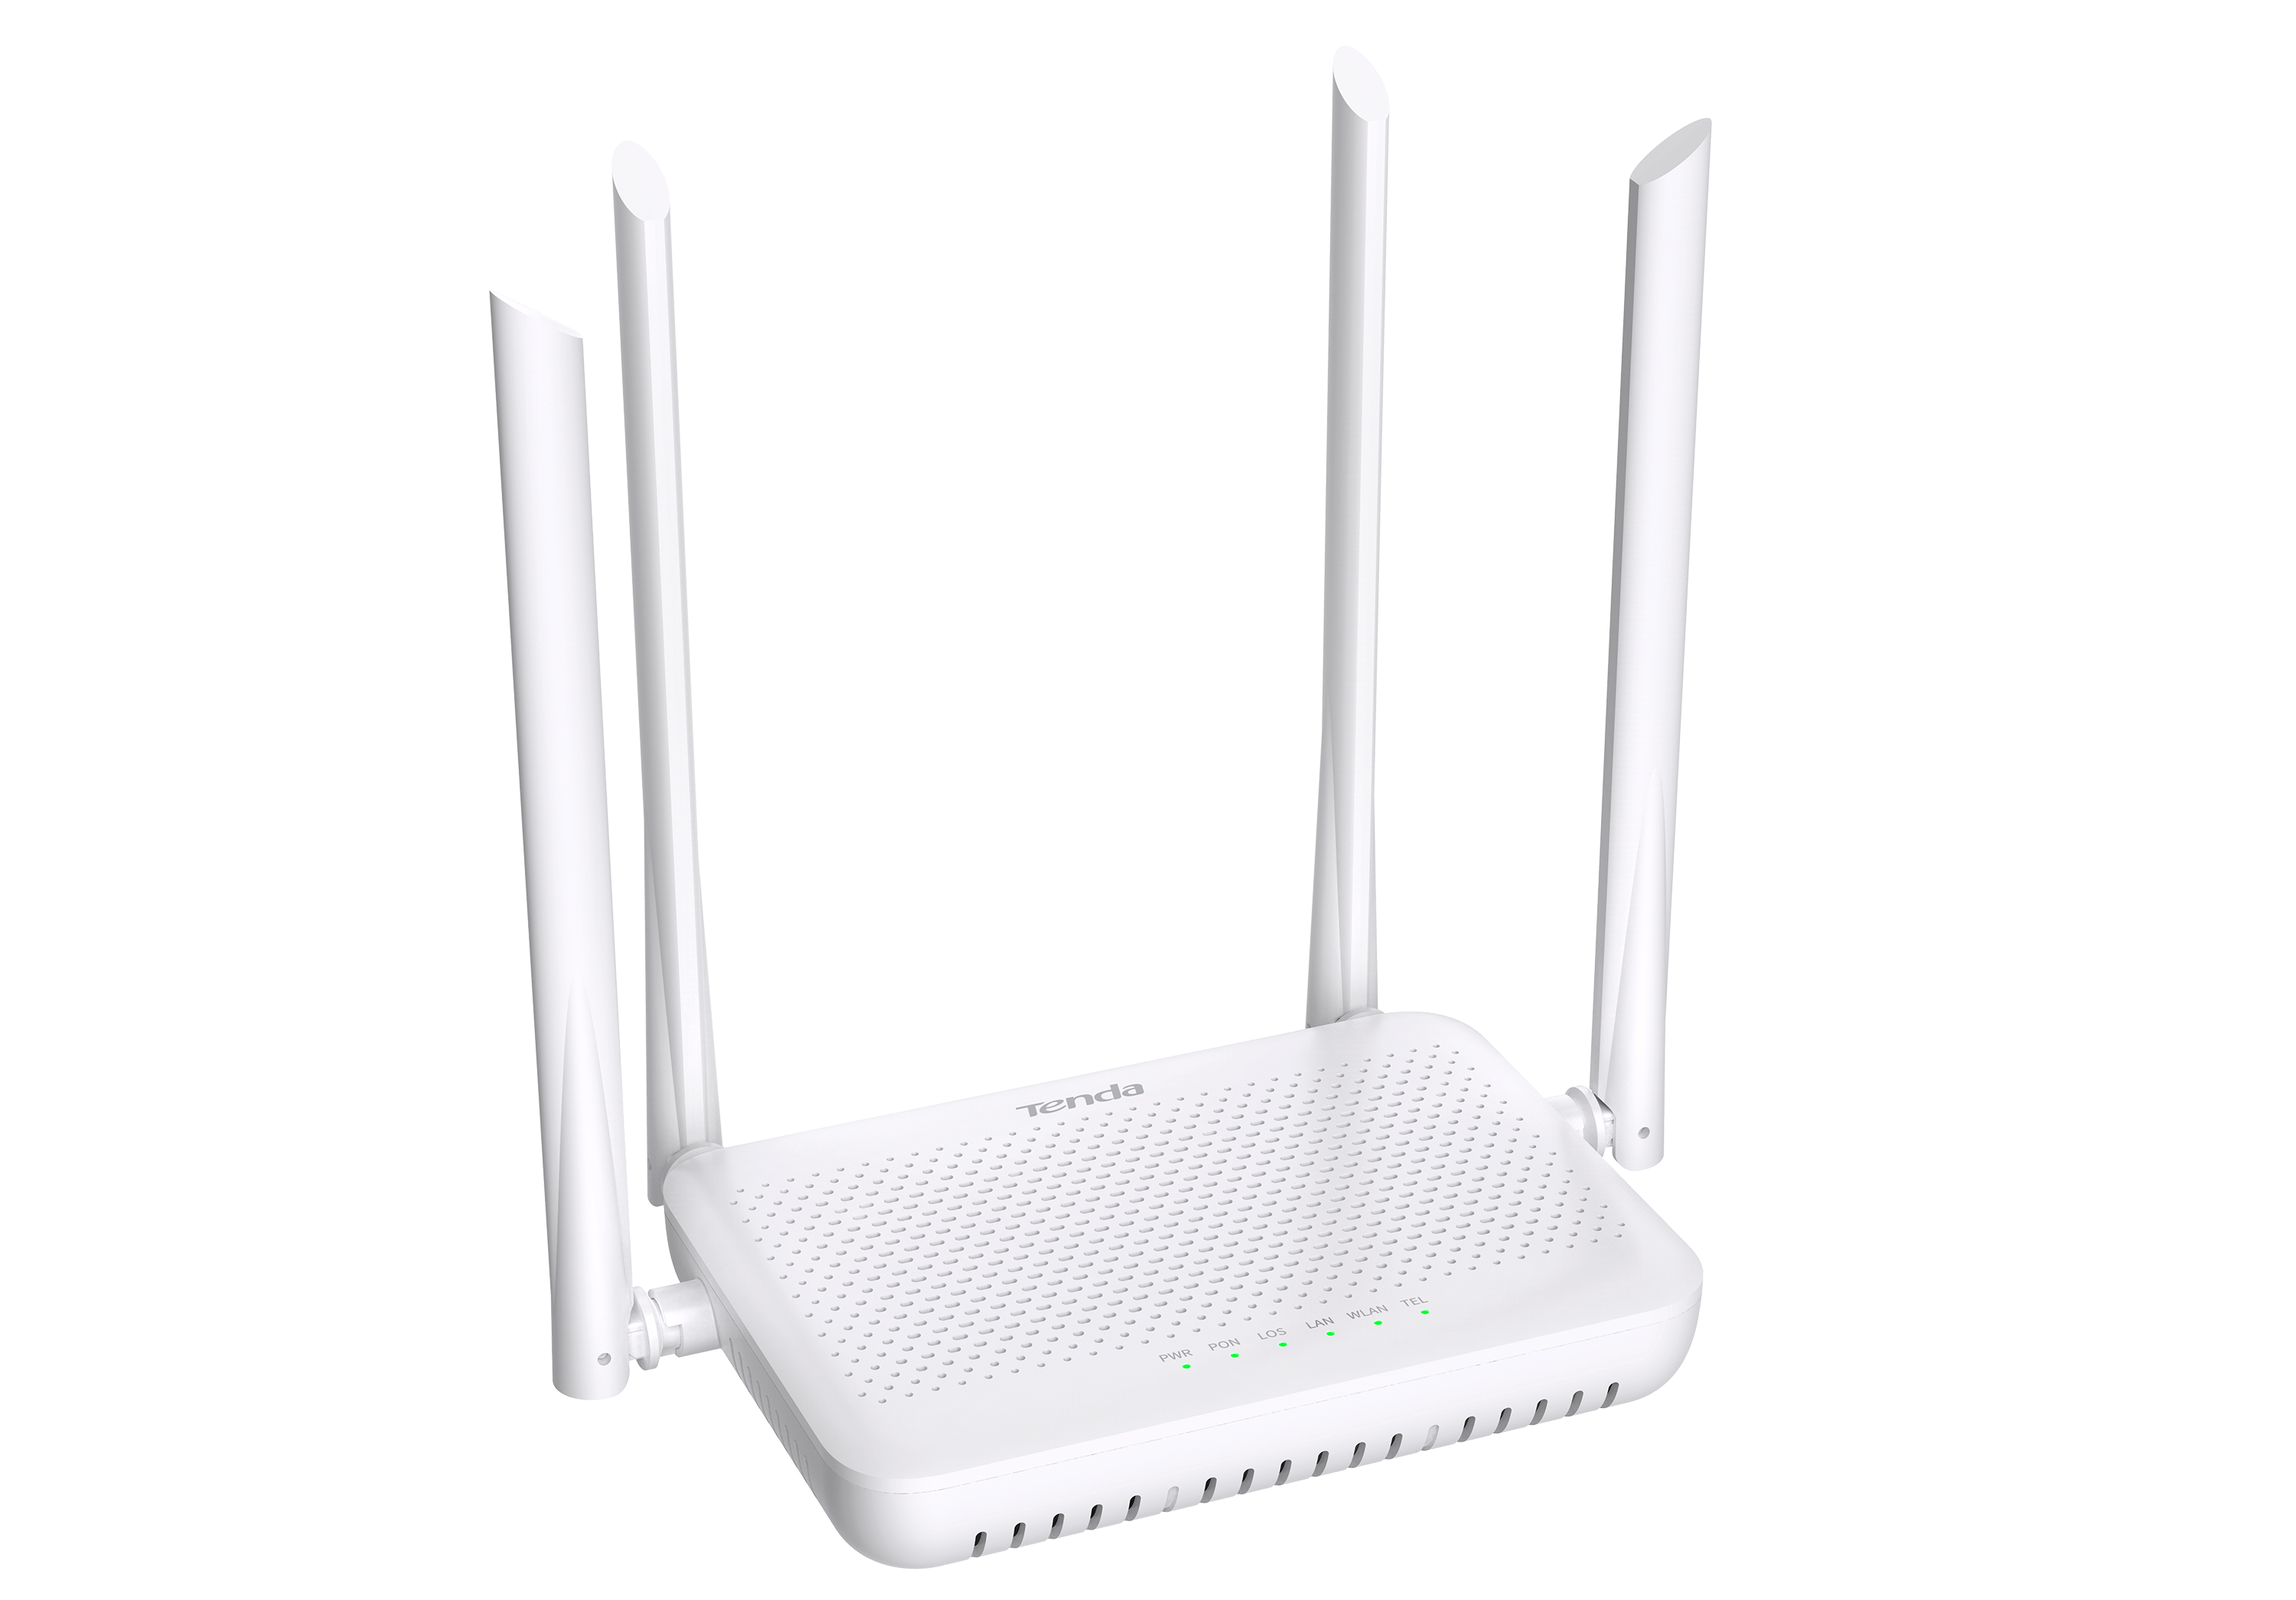
AX1500 Wi-Fi6 Volp XPON ONT
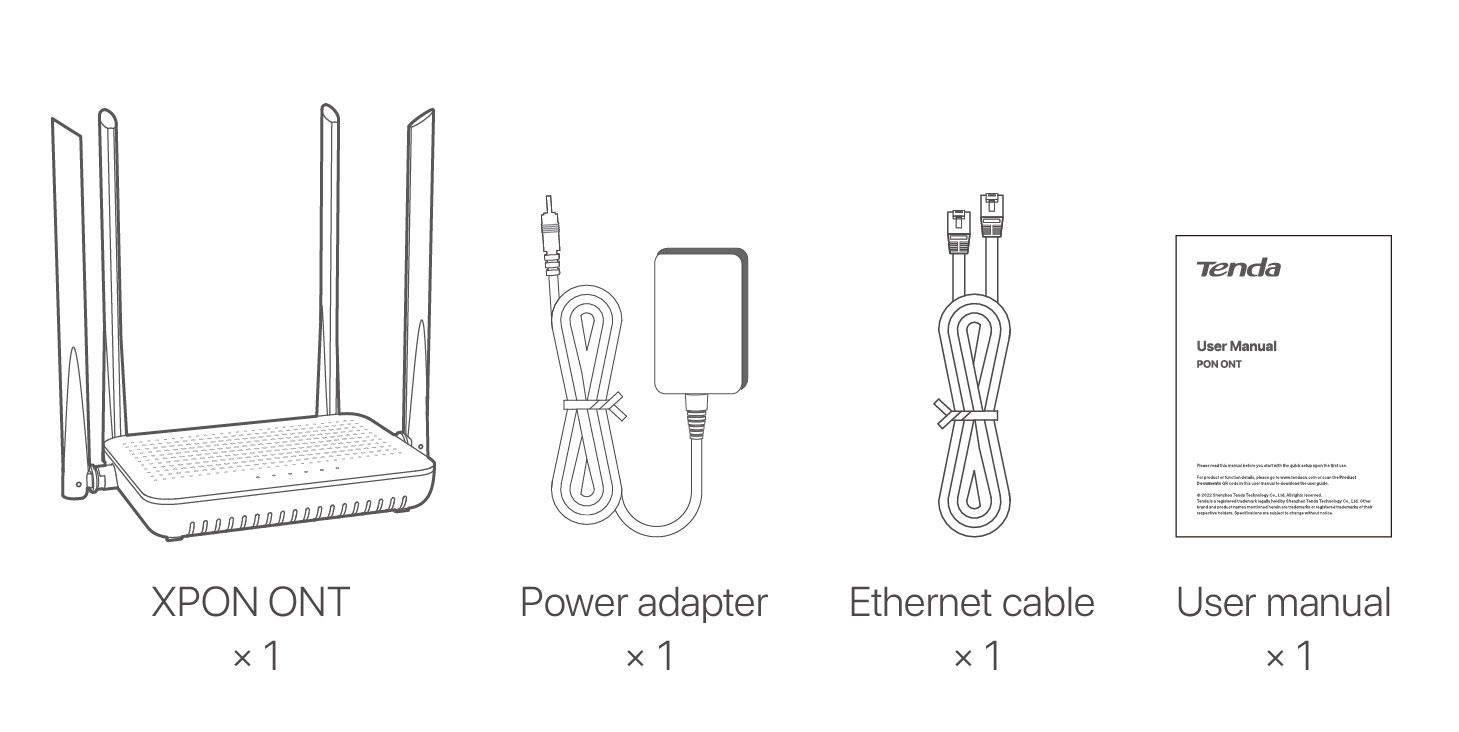
Get to know the ONT
LED indicators

LED indicator |
Color |
Status |
Description |
PWR |
Green |
Solid on |
The ONT is powered on properly. |
Off |
The ONT is powered off or not powered on properly. |
||
PON |
Green |
Solid on |
The ONT is registered successfully. |
Blinking |
The registration is not completed (unregistered or registering). |
||
Off |
The received optical power is lower than the optical receiver sensitivity, or no fiber cord is connected. |
||
LOS |
Red |
Blinking |
The received optical power is lower than the optical receiver sensitivity, or no fiber cord is connected. |
Off |
The received optical power is within the optical receiver sensitivity. |
||
LAN |
Green |
Solid on |
The LAN port is connected properly, but no data is being transmitted over the corresponding port. |
Blinking |
The LAN port is connected properly, and data is being transmitted over the corresponding port. |
||
Off |
No Ethernet device is connected or the Ethernet device is not connected to the LAN port properly. |
||
WLAN |
Green |
Solid on |
The Wi-Fi network is enabled. |
Blinking |
The WPS negotiation is ongoing. |
||
Off |
The Wi-Fi network is disabled. |
||
TEL |
Green |
Solid on |
The ONT is registered with IMS, but no data is being transmitted. |
Blinking |
The ONT is registered with IMS, and data is being transmitted. |
||
Off |
The ONT is not registered with IMS. |
Ports & Buttons
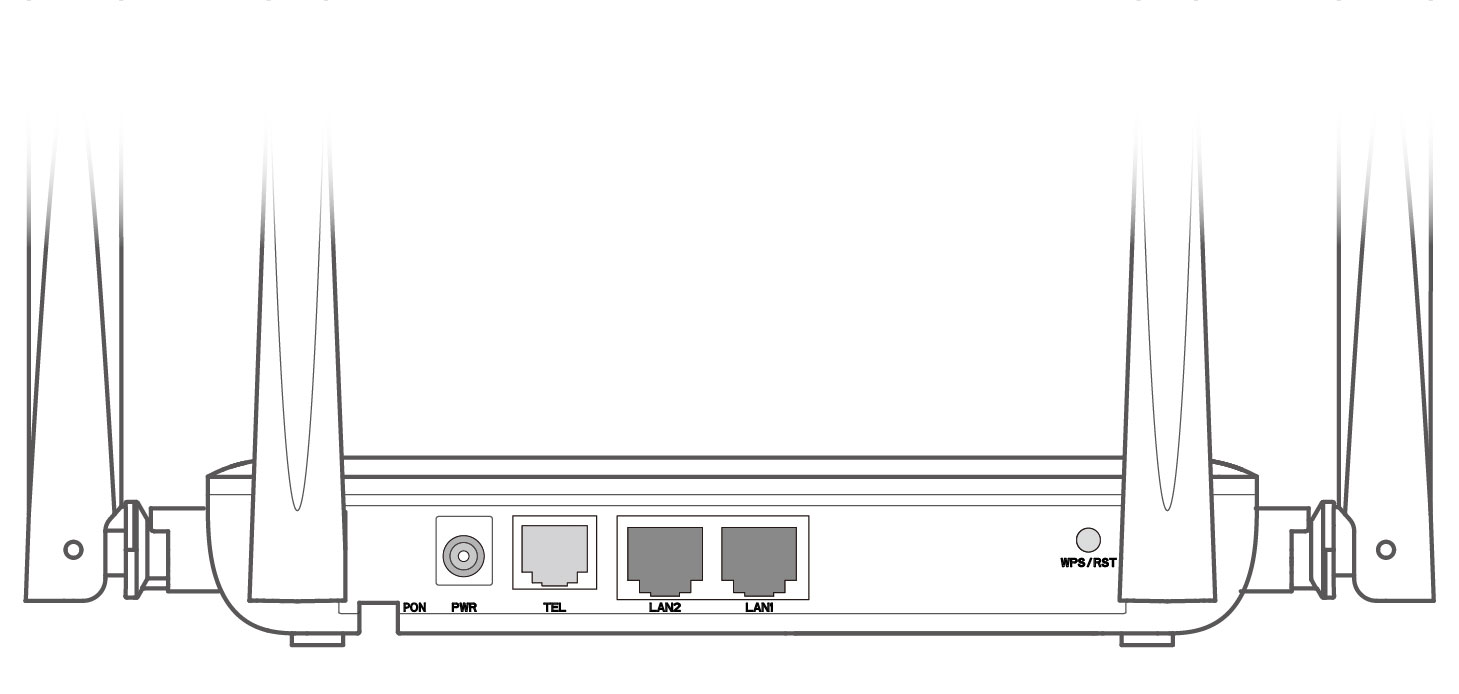
Port/Button |
Description |
PON |
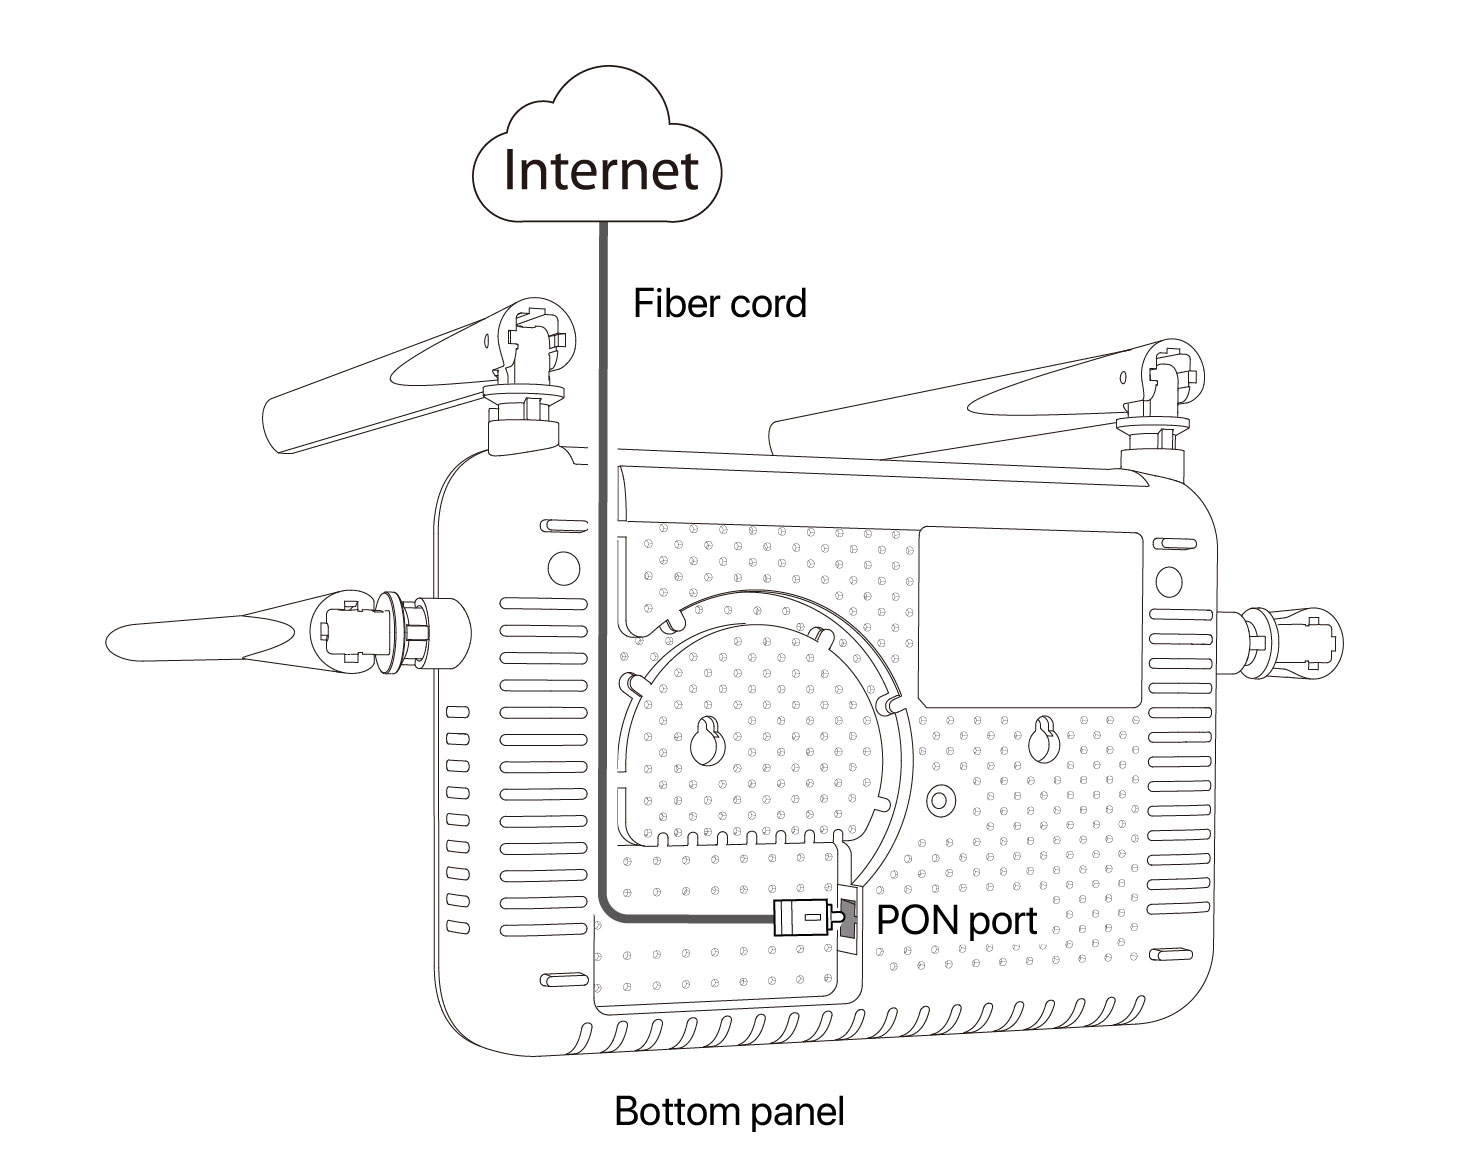
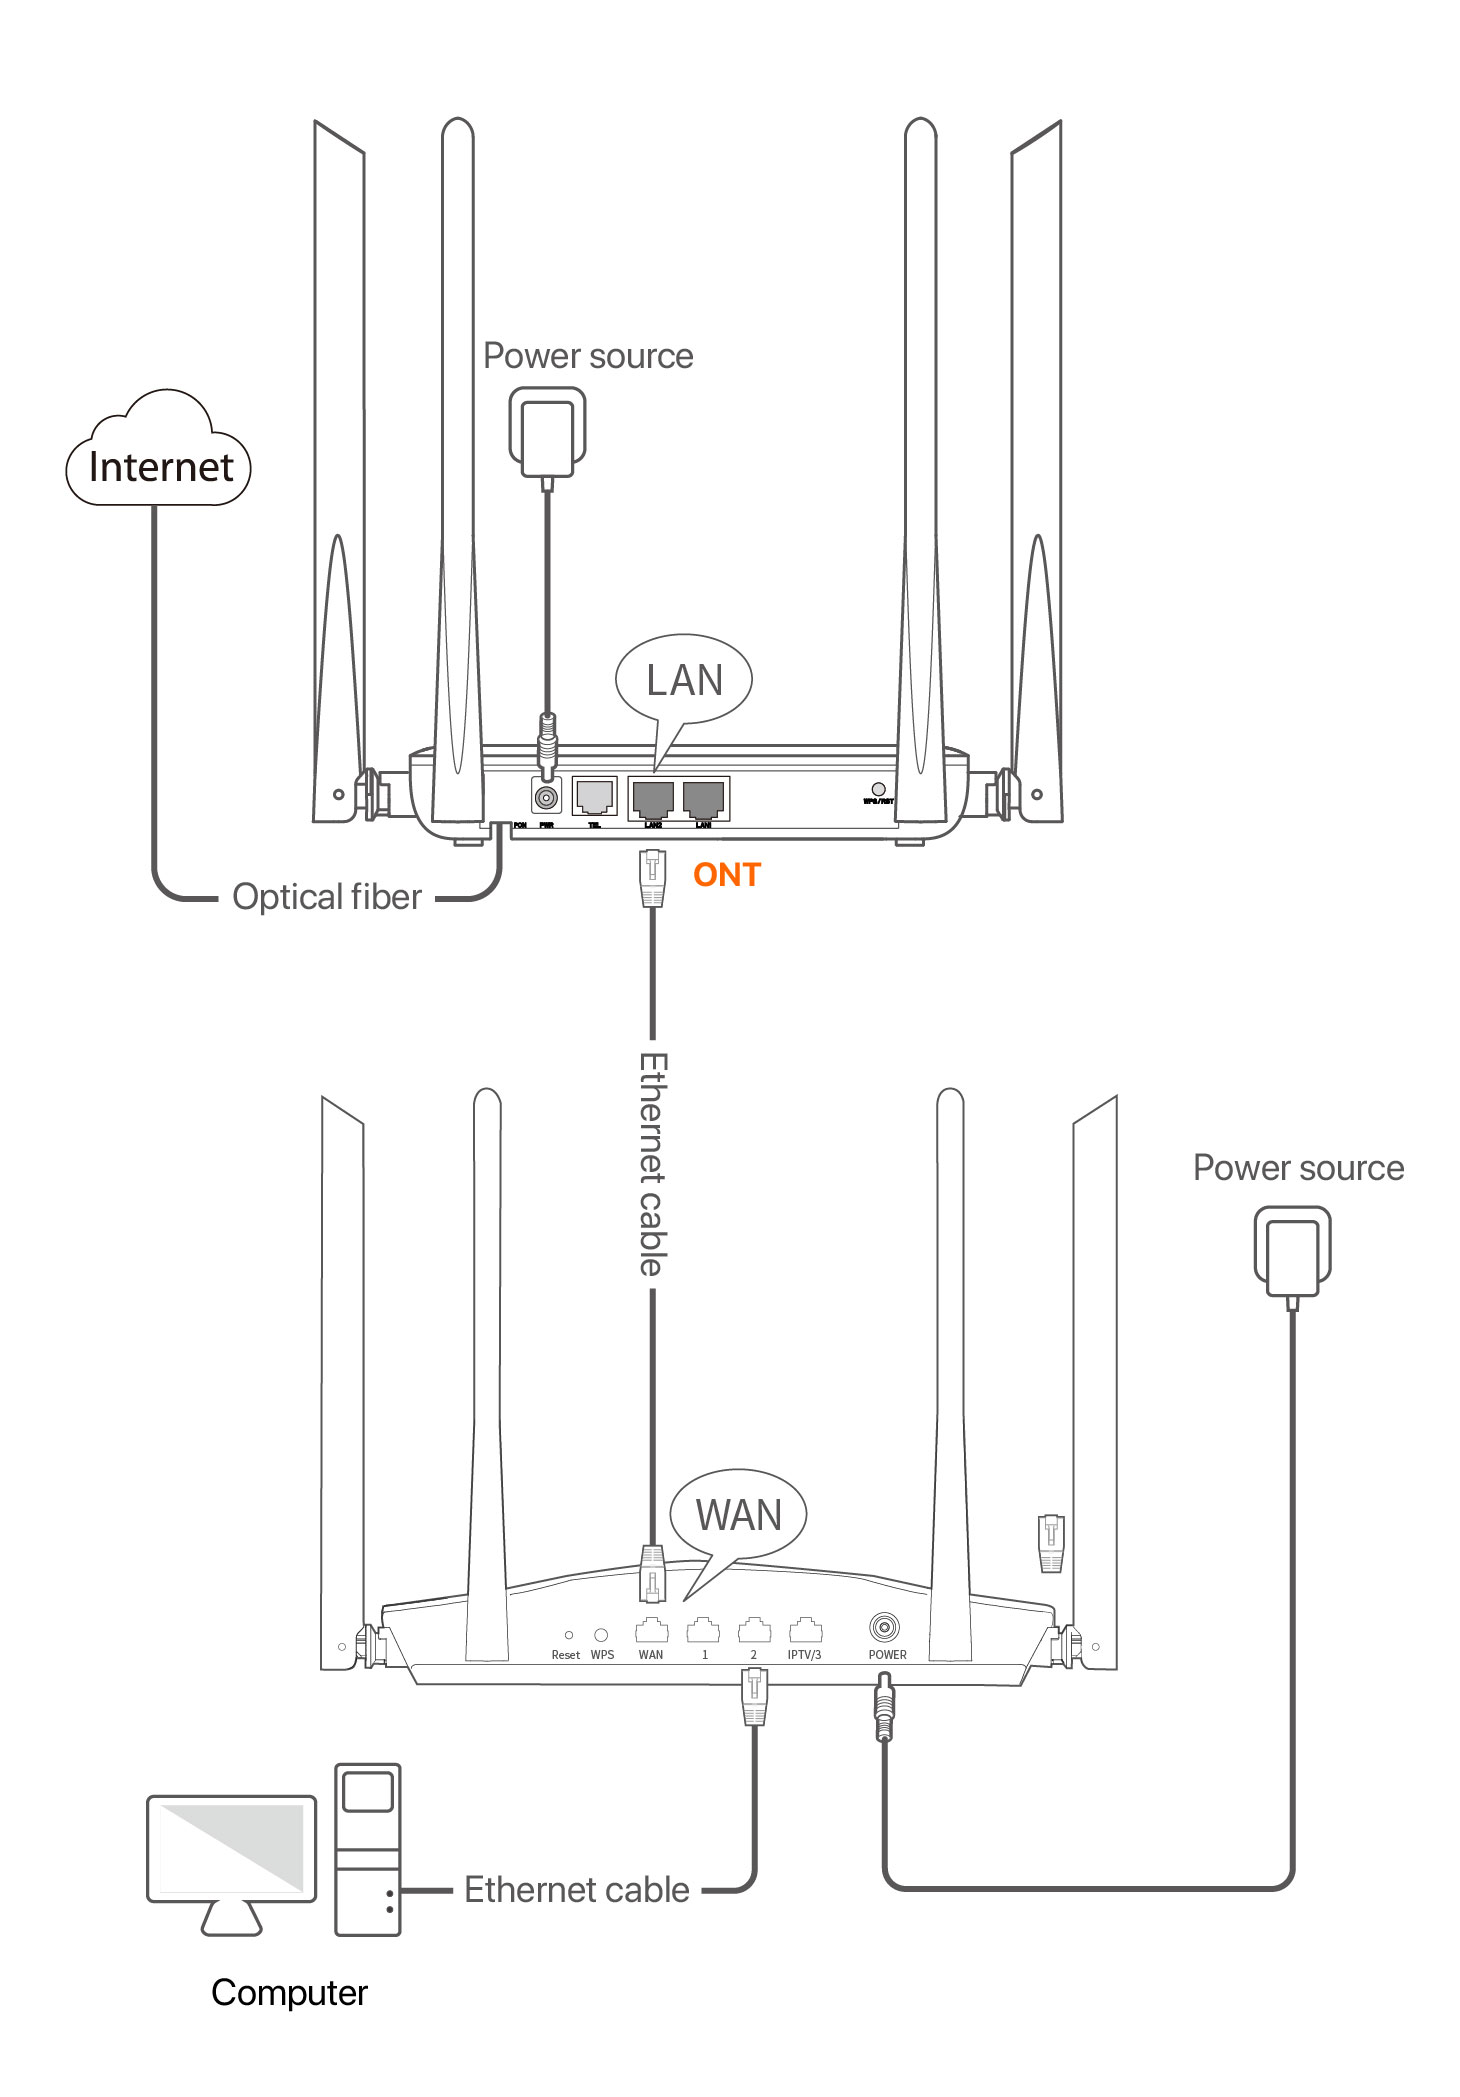
Optical fiber port.You can find it on the bottom of the ONT, which is used to connect to a fiber cord. |
PWR |
Power jack.Used to connect the ONT to a power source using the included power adapter. |
TEL |
Telephone port.Used to connect to a telephone for voice service using a telephone cable, which needs to be prepared by yourself. |
LAN1/2 |
Gigabit LAN ports.Used to connect to such devices as routers, switches, computers or IPTV set-top boxes. |
WPS/RST |
WPS/Reset button.
|
Tips
This ONT supports wall mounting (two mounting holes on the bottom). The recommended parts are as follows:
-
Expansion bolt: PA6*26.4mm; inner diameter: φ2.4
-
Screw: Quantity: 2; Diameter: 2.5-4.0mm; head diameter: 5.0-6.5mm.
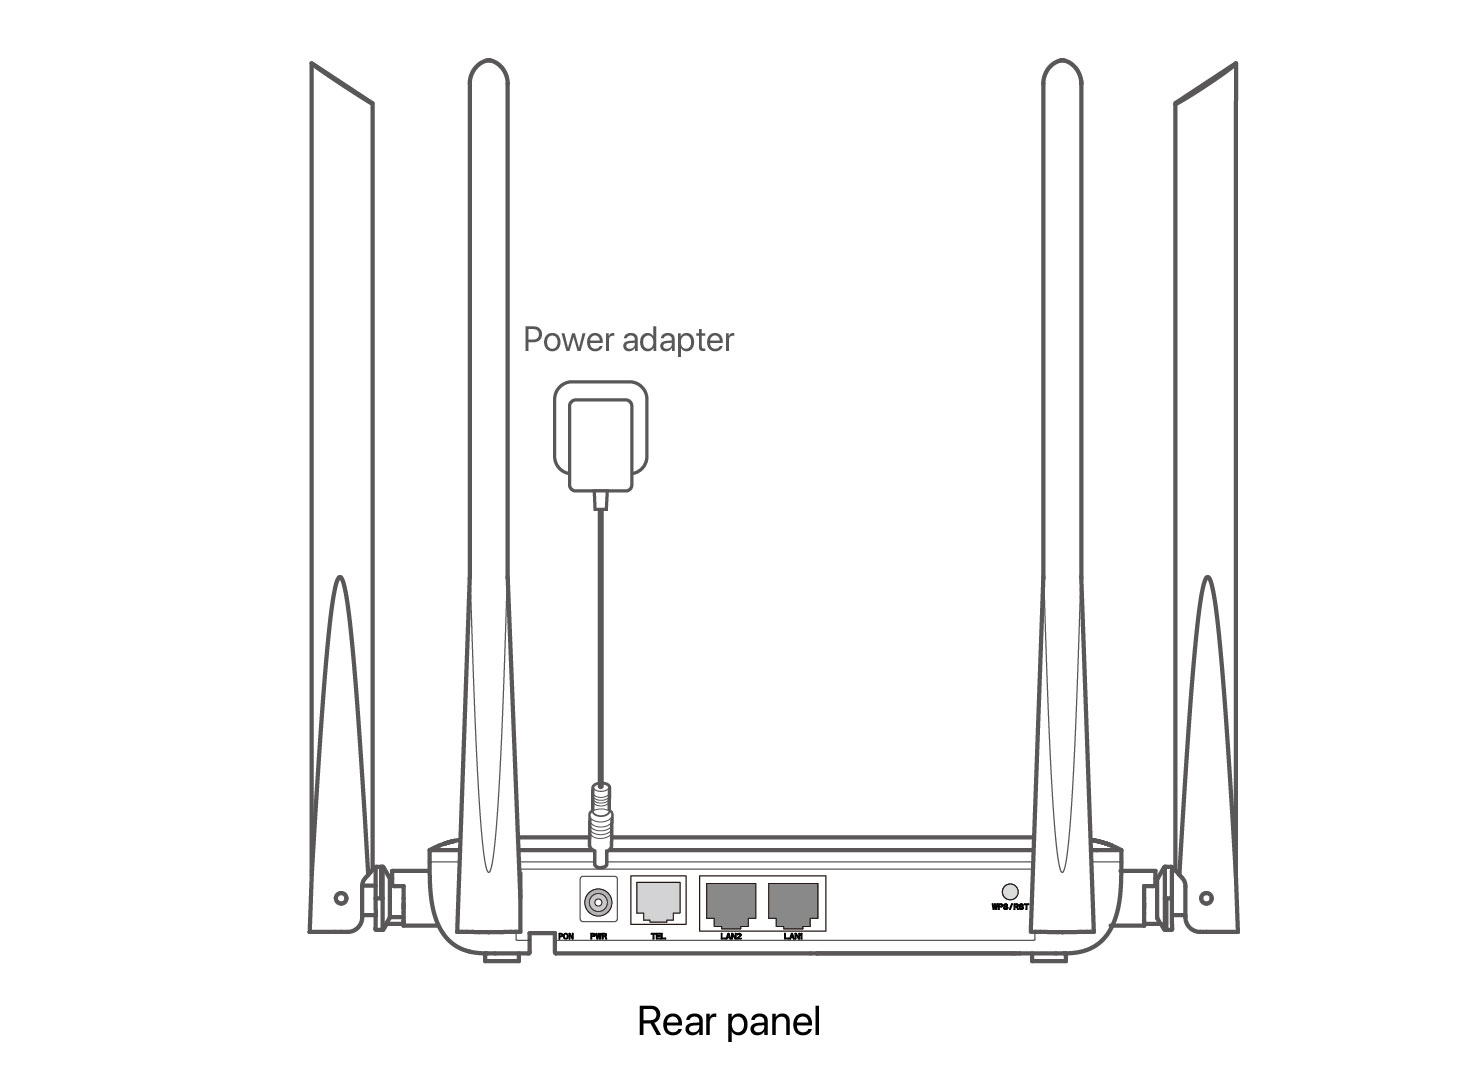
1. Connect and register the ONT
 Caution, laser
DO NOT look directly at the PON port when the device is powered on, as well as the terminal of the indoor fiber cord, to prevent any harm to your eyes.
Connect the ONT as shown in the figure. Wait until the PON LED indicator lights solid on, then the ONT is registered successfully.
Tips
If ISP provides any parameters for registration, you can use them to manually register the ONT with the quick registration function. The quick registration function is available only when the ONT is registered for the first time.
Method:
①. Connect to the ONT.
-
Wired device: Connect a LAN port of the ONT to a wired device, such as a computer, using an Ethernet cable.
-
Wireless device: Connect your wireless device, such as a smartphone, to the Wi-Fi network of the ONT using the SSID (Wi-Fi name) and Key (Wi-Fi password) on the bottom label.
②. Enter 192.168.1.1 in a web browser and log in to the web UI of the ONT with user permissions or administrator permissions.
-
User Permissions: Able to view and modify partial configurations of the ONT. The default login user name is admin. You can get the password from the bottom label on the ONT.
-
Administrator Permissions: Able to view and modify all configurations of the ONT. The default login user name and password are both root for the installation and maintenance personnel only.
③. In GPON Settings (or EPON Settings) module, register with the parameters provided by your ISP and click Apply Changes.
2. Configure the internet access
Tips
-
PPPoE is used for illustration here. Change the parameters as required by your ISP.
-
Choose a desired mode to configure your internet access:
Router mode: Configure the internet on the ONT.
Bridge mode: Dial-up on a router or terminal.
Router mode
Step 1: Log in to the web UI
Tips
You can log in to the web UI of the ONT with user permissions or administrator permissions. Administrator permissions are for the installation and maintenance personnel only.
-
User Permissions: Able to view and modify partial configurations of the ONT. The default login user name is admin. You can get the password from the bottom label on the ONT.
-
Administrator Permissions: Able to view and modify all configurations of the ONT. Some configurations changed by the installation and maintenance personnel will affect the normal operation of the ONT. Therefore, use the administrator permissions with caution. The default login user name and password are both root.
①. Connect to the ONT.
- Wired device: Connect a LAN port of the ONT to a wired device, such as a computer, using an Ethernet cable.
- Wireless device: Connect your wireless device, such as a smartphone, to the Wi-Fi network of the ONT using the SSID (Wi-Fi name) and Key (Wi-Fi password) on the bottom label.
②. Start a web browser and visit 192.168.1.1.
③. Enter the User Name and Password according to the actual permissions.
④. Click Login.

Tips
If the above page does not appear, refer to Q1 in FAQ.
Step 2: Set up a WAN connection
Tips
For initial registration of the ONT, you can configure the quick registration function according to the page prompts. In INTERNET Settings module, you can set the parameters to set up a WAN connection according to your ISP and your own need, and click Apply Changes. If not, refer to the following to set up a WAN connection.
①. Choose WAN > PON WAN.
②. Tick Enable VLAN.
③. Enter the VLAN ID provided by your ISP.
④. Set Channel Mode to PPPoE.
⑤. Set Connection Type to INTERNET.
⑥. Enter the PPPoE UserName and Password provided by your ISP.
⑦. Set other parameters according to your ISP and your own need.
⑧. Click Apply Changes.
⑨. Click OK when Change setting successfully is shown on the page.

Done.
To access the internet:
-
Connect your wired device, such as a computer, to a LAN port of the ONT.
-
Connect your wireless device, such as a smartphone, to the Wi-Fi networks of the ONT, using the SSID (Wi-Fi name) and Key (Wi-Fi password) on the bottom label.
Tips
Bridge mode
Tips
When the ONT is set to bridge mode, configure internet settings based on ISP requirements.
Access internet over PPPoE
①. Connect a LAN port of the ONT to the WAN port of the router using an Ethernet cable.
②. Connect your computer to a LAN port of the router using an Ethernet cable.
③. Set up a PPPoE connection on the router as required.
After the settings, you can access the internet through the router.
Safety Precautions
Before performing an operation, read the operation instructions and precautions to be taken, and follow them to prevent accidents. The warning and danger items in other documents do not cover all the safety precautions that must be followed. They are only supplementary information, and the installation and maintenance personnel need to understand the basic safety precautions to be taken.
- For wall mounting, the equipment is only suitable for mounting at heights ≤ 2m.
- For desktop mounting, the device must be horizontally mounted for safe use.
- Do not use the device in a place where wireless devices are not allowed.
- Please use the included power adapter.
- Mains plug is used as the disconnect device, and shall remain readily operable.
- The power socket shall be installed near the device and easily accessible.
- Operating environment: Temperature: 0℃ to 45℃; Humidity: (10% - 90%) RH, non-condensing; Storage environment: Temperature: -40℃ to +70℃; Humidity: (5% - 90%) RH, non-condensing.
- Keep the device away from water, fire, high electric field, high magnetic field, and inflammable and explosive items.
- Unplug this device and disconnect all cables during lightning storms or when the device is unused for long periods.
- Do not use the power adapter if its plug or cord is damaged.
- If such phenomena as smoke, abnormal sound or smell appear when you use the device, immediately stop using it and disconnect its power supply, unplug all connected cables, and contact the after-sales service personnel.
- Disassembling or modifying the device or its accessories without authorization voids the warranty, and might cause safety hazards.
Technical Support
- Shenzhen Tenda Technology Co., Ltd.
- Floor 6-8, Tower E3, No.1001, Zhongshanyuan Road, Nanshan District, Shenzhen, China. 518052
- USA hotline: 1-800-570-5892
- Website: www.tendacn.com
- E-mail:
- support@tenda.com.cn
- support.de@tenda.cn (Deutsch)
- support.fr@tenda.cn (Français)
- support.es@tenda.cn (Español)
- support.it@tenda.cn (Italiano)
- support.uk@tenda.cn (United Kingdom)
- support.usa@tenda.cn(USA/CA)
Copyright
© 2023 Shenzhen Tenda Technology Co., Ltd. All rights reserved.
Tenda is a registered trademark legally held by Shenzhen Tenda Technology Co., Ltd. Other brand and product names mentioned herein are trademarks or registered trademarks of their respective holders. Specifications are subject to change without notice. V1.0 Keep for future reference.